Puzzled about installing a split AC and unsure where to begin? You’re not alone. Plenty of homeowners and renters want cooler rooms without paying steep install fees, yet worry about drilling, wiring, and safely setting the indoor and outdoor units. In this Indoor & Outdoor Units DIY guide, you’ll see what you can confidently handle, what belongs to certified pros, and how to plan the whole project so the system runs efficiently, quietly, and for years—without voiding warranties.
The real challenge: planning, safety, and compliance before you lift a tool
The toughest part of a split AC install isn’t hanging the wall cassette; it’s grasping the scope. A proper installation blends carpentry (mounting), wall penetration, routing copper lines and a drain, electrical work, and commissioning tasks such as vacuuming, leak testing, and opening refrigerant lines. In many regions, refrigerant handling is regulated and limited to certified technicians. That matters, because a bad install can leak, cool poorly, waste energy, and void warranties.
Begin by separating DIY-friendly steps from pro-only tasks. Generally, you can choose locations, install the mounting plate, drill the service hole, place the outdoor unit on a stable base, route the line set and drain, and weatherproof penetrations. A licensed HVAC technician should manage refrigerant-circuit work (flaring, leak tests, evacuation, charging) and the final electrical connections to the main panel where code requires it. In the U.S., for instance, refrigerant work requires certification (EPA Section 608).
Safety first. You’ll likely use a ladder, power drill, a hammer drill for masonry, and possibly a hole saw for exterior walls. Wear eye protection, gloves, hearing protection, and a dust mask. Kill power at the breaker before any electrical work. Check permit and code requirements locally. Many manufacturers demand professional installation to honor warranties—confirm your model’s policy in the installation manual.
Key prep steps:
- Read the manufacturer’s installation manual end to end for your exact model.
- Verify wall structure (studs, pipes, wires) before drilling.
- Plan the drain route with continuous downward slope to outside or a suitable drain—no sags.
- Choose a path for the line set that avoids tight bends and physical damage.
- Plan electrical supply per code; consider a dedicated circuit and outdoor disconnect if required.
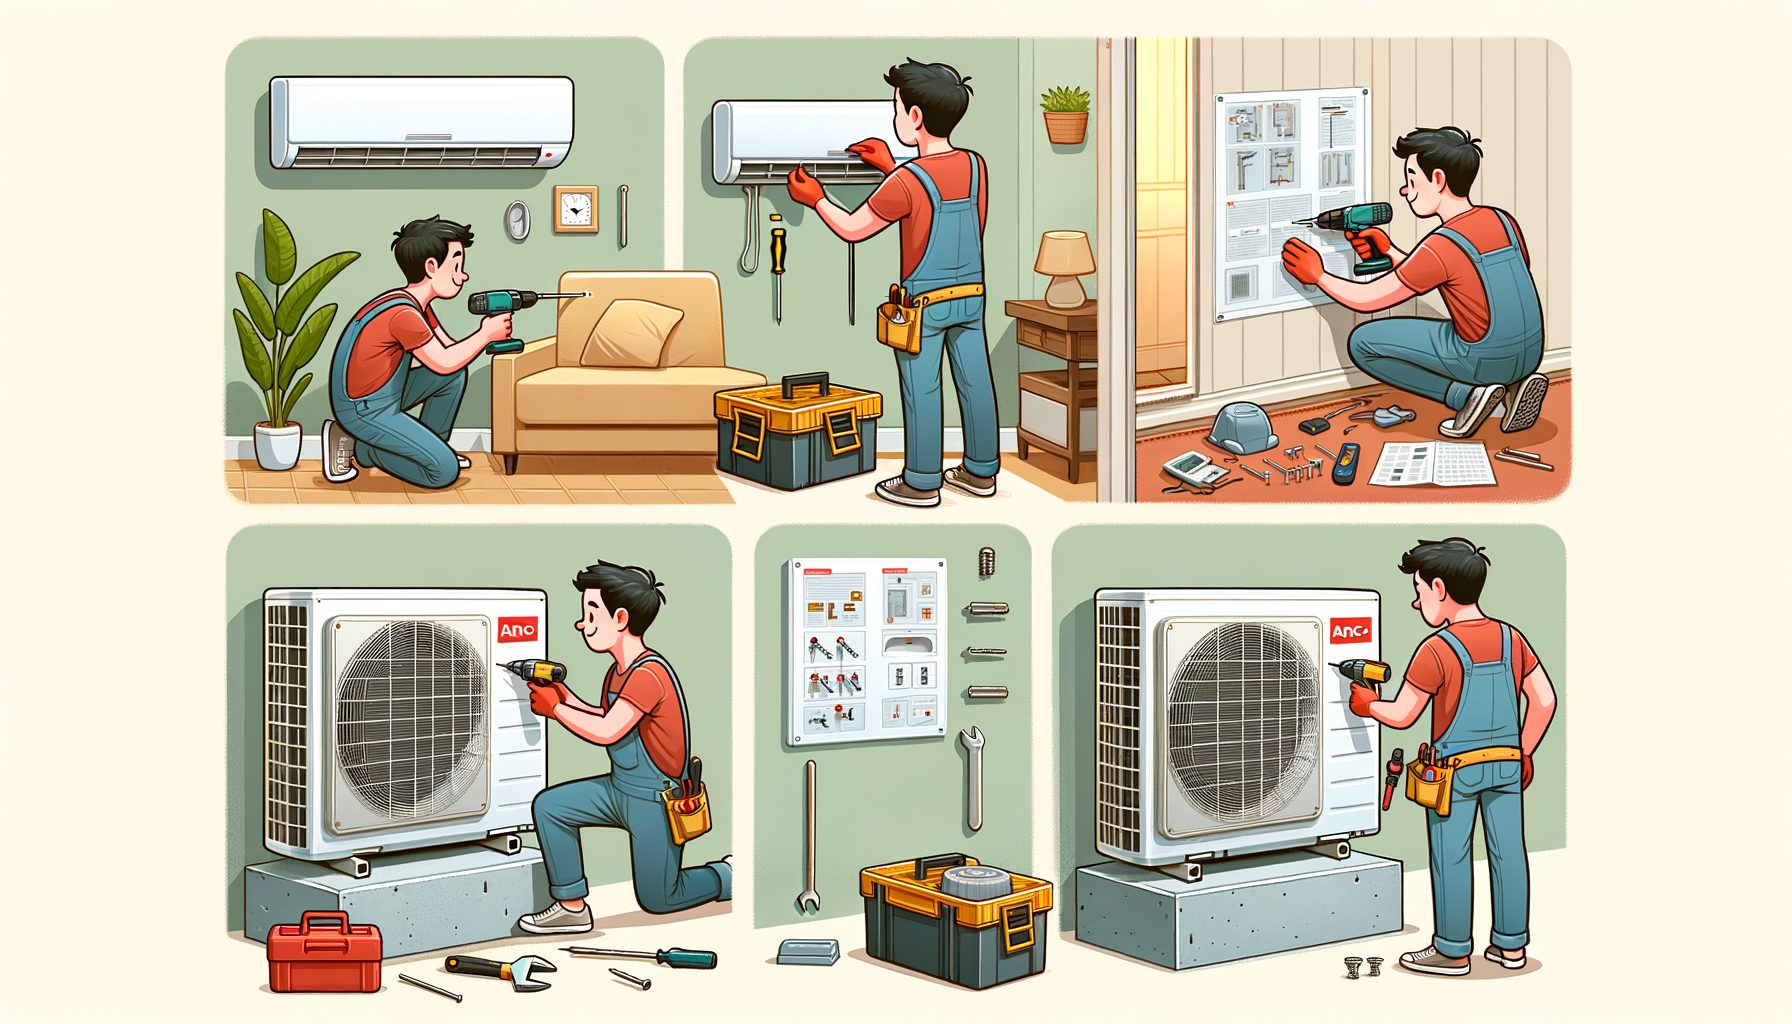
Indoor unit: location, mounting, and condensation drainage done right
Pick a location that gives central airflow to the room, away from heat sources (ovens, direct sun, electronics clusters) and obstructions that block air. Leave the clearances your manufacturer specifies for proper intake and discharge. Height counts: too high can cause stratification; too low can push air into furniture. Follow the manual’s minimums.
Mounting comes next. Use the provided wall plate with a level and anchors suited to your wall material (wood studs, concrete, or brick). On drywall, hit studs whenever possible; in masonry, use proper anchors. Keep the unit dead level so condensate drains correctly. Measure twice, mark once, and make sure the plate sits flat. A crooked plate invites vibration, noise, and leaks.
Drill the service hole for the line set, drain hose, and signal cable with a slight downward pitch toward the outside so water can’t flow back in. Insert a wall sleeve or bushing to protect lines and limit air leakage. Deburr sharp edges to avoid nicking insulation or hoses. When routing the line set, avoid kinks and overly tight bends; protect it with the manufacturer’s insulation and a UV-resistant exterior cover for durability and a clean look.
Condensation management is crucial. Gravity drains are best: maintain steady downward slope to outside or an approved drain point. Don’t create traps or upward loops, and keep the hose free of dips where water can pool. If gravity won’t work, use a condensate pump rated for the lift you need and add a safety cutoff if available. Test by pouring a small amount of clean water into the drain pan before closing the cover—look for steady flow outside and zero drips inside.
Before hanging the indoor unit, double-check cable routing and slack. Keep signal cables tidy and away from pinch points. Once the unit locks onto the plate, confirm it’s fully seated. Now is also a good moment to verify filter access for maintenance—hard-to-reach filters get cleaned less often, and performance suffers.
Outdoor unit: placement, airflow, vibration control, and weatherproofing
Clear, cool air keeps the outdoor condenser efficient. Choose a spot that avoids enclosed corners, dryer vents, and clutter. Shade helps, but never block airflow. Maintain the clearances your manufacturer specifies on all sides and above so the fan can breathe and reject heat. In snowy or rainy climates, consider a raised stand or wall brackets to stay above water, debris, and snow lines.
Stability and vibration control matter. Set the unit on a level, rigid base: a pre-cast pad on compacted gravel, a paver base, or code-approved wall brackets anchored into solid structure. Add rubber isolation pads to reduce vibration and noise transfer into the building. Tighten bolts snugly—avoid crushing the pads. Recheck level afterward and confirm refrigerant ports remain accessible.
Map the line set route between indoor and outdoor units along the shortest practical path that avoids sharp edges, heat sources, and crush risks. Protect lines in conduit or line hide outdoors for UV resistance and tidy aesthetics. Seal all wall penetrations with exterior-grade sealant or expanding foam to keep out moisture, insects, and hot air. Use drip loops where appropriate to prevent water from following cables into the building.
Electrical and code considerations: most outdoor units need a dedicated power supply and an outdoor service disconnect within sight of the condenser. Follow local electrical codes. If you’re not experienced with electrical work, hire a licensed electrician to size wiring, install the breaker, and set the disconnect. Inside, separate control wiring from power lines to reduce interference; match terminal labels exactly to the manufacturer’s diagram.
Planning for future maintenance pays off. Leave room to clean the coil, service the fan, and access panels. Keep shrubs and debris away. In coastal or polluted areas, consider factory-approved coil coatings or plan on more frequent cleanings to protect efficiency and lifespan.
Connections, evacuation, and commissioning: DIY vs pro tasks and how to collaborate
Connecting refrigerant lines, evacuating the system, and opening valves is the stage where many DIY projects pause. Refrigerant work is regulated in many countries, and incorrect procedures risk leaks, compressor damage, and environmental harm. A certified HVAC technician will prepare line ends, torque flare fittings correctly, pressure test with dry nitrogen, pull a deep vacuum with a micron gauge, verify tightness, and open service valves per the manual. Done right, that step protects your investment and keeps you compliant.
To streamline the pro visit and trim costs, handle the mechanical prep: mount both units, route and protect the line set and drain, and pull the control cable—leaving final connections at the condenser accessible. Label both ends of cables and lines so a tech can quickly confirm sizes and routing. Provide clear access to service valves and keep the work area clean and safe. Have the installation manual ready, and note site-specific issues (long runs, elevation differences, unusual routing) that could affect charge adjustments or settings.
Commissioning goes beyond vacuum and valves. After power-up, your technician may check operating current, measure supply/return temperature split, confirm fan modes, and listen for abnormal noise or vibration. You can walk through controls, set energy-saving schedules, and verify Wi‑Fi connectivity if supported. Together, confirm proper condensate drainage, correct start/stop behavior, and the absence of error codes.
Well, here it is to help you plan costs and responsibilities:
| Task | DIY Friendly? | Typical Time | Notes / Cost Clues |
|---|---|---|---|
| Mount indoor unit + drill service hole | Yes (with proper tools) | 2–4 hours | Check structure; use correct anchors; maintain drain slope |
| Place outdoor unit on pad or brackets | Yes | 1–2 hours | Level base, vibration pads, weather clearance |
| Route line set, drain, and control cable | Yes (prep only) | 2–4 hours | Protect lines; avoid kinks; seal penetrations |
| Electrical breaker, disconnect, final connections | Often Pro | 1–3 hours | Licensed electrician per local code |
| Pressure test, vacuum, open valves, verify charge | Pro only | 1–2 hours | Certified tech; protects warranty and system life |
If you prefer a packaged approach, some brands offer pre-charged line systems or quick-connect fittings. What’s interesting too is that even with those, you should review warranty terms and local regulations, and consider a pro check to validate performance and safety.
Q&A: common questions about DIY split AC installation
Q1: Is it legal to install a split AC myself?
It depends on your location and which parts you do. Mounting units and routing lines is often allowed, but refrigerant handling typically requires a certified technician. Check local codes and your warranty terms, and review official guidance like the U.S. EPA Section 608.
Q2: Do I really need a vacuum pump and gauges?
For commissioning, yes—your system must be evacuated and leak-checked before opening service valves. A certified HVAC pro should handle it with the correct tools and procedures.
Q3: How long does a DIY-plus-pro install take?
Many homeowners complete the prep in a day (mounting, drilling, routing), and a technician can often finish commissioning in 1–3 hours, depending on complexity, line length, and any electrical work needed.
Q4: Will DIY installation void my warranty?
Some manufacturers require professional installation for full warranty coverage. Read your product’s warranty terms, and keep invoices and photos of the install to document compliance with manufacturer instructions.
Sources and further reading: ENERGY STAR Heating & Cooling • EPA Section 608 (U.S.) • ACCA guidelines • Example manufacturer resources: Mitsubishi Electric, Daikin Residential
Conclusion
Installing a split AC is a project you can help lead—especially the planning, mounting, and routing—so long as you respect safety, code, and warranty rules. You’ve learned why planning is the hardest part; how to choose smart indoor and outdoor locations; how to mount securely and route drains with proper slope; and why refrigerant tasks, evacuation, and final electrical work belong to certified pros. Then this: collaborate with a technician to keep costs down and performance high, using the quick table as a who-does-what guide.
Your next move is simple: pick the target room, read your unit’s installation manual, and sketch a plan marking the indoor location, outdoor placement, line path, and drain route. Call a licensed HVAC pro and, if needed, an electrician to confirm code requirements, schedule commissioning, and discuss site-specific considerations. Take photos as you go, label cables and lines, and save all packaging and documentation for warranty and service.
If you’re ready to start, bookmark this guide, enlist a friend to help, and gather your safety gear and tools. When careful DIY prep meets a solid pro finish, you get a cool, quiet room, lower energy bills, and a system built to last—without surprises.
Big projects start with small steps. Well, here it is: measure the wall, find the studs, or map the drain path—pick one action today and move your install forward.
Article sources:
– U.S. EPA Section 608 Technician Certification: https://www.epa.gov/section608
– ENERGY STAR Heating & Cooling guidance: https://www.energystar.gov/campaign/heating_cooling
– ACCA industry resources: https://iq.acca.org/
– Manufacturer resources (examples): Mitsubishi Electric, Daikin